Steps to Install Kubernetes Dashboard
While kubernetes provides control over the containers, the K8s dashboard provides the graphical interface for cluster management. This dashboard provides a visual representation of the cluster’s state, making it easier for users to monitor, troubleshoot, and manage applications. In this blog, we will show you a simple guide to installing a kubernetes dashboard in your environment.
Requirements
For the installation of the dashboard in our environment we need the following,
- 2 Node Cluster (1 Master VM with 2 Nodes)
- Kubernetes Components
Infrastructure Overview
- In the process of installing the kubernetes dashboard, we need to install and configure the 2-node cluster in our environment. Here, we had already installed and configured in our demo environment.
- To learn how to install & configure the clusters visit our blog where we explain the step-by-step process of installation and configuration of clusters.
Installing Kubernetes Dashboard
- Firstly, we need to log in to the master server through Putty.
- As the kubernetes dashboard will not be installed in our environment by default, use the link to install it.
- Don’t be in a hurry as it will take some time to get installed.
Configuring Kubernetes dashboard
- Bravo! we had installed our kubernetes dashboard in our environment.
- But, for your info, the dashboard will get installed with minimum user role privileges only.
- To access the dashboard with full administration, we need to create a YAML file with the name dashboard-admin.yaml.
vi dashboard-admin.yaml
- Add the below coding in the YAML file and save it.
apiVersion: rbac.authorization.k8s.io/v1beta1kind: ClusterRoleBindingmetadata: name: kubernetes-dashboard labels: k8s-app: kubernetes-dashboardroleRef: apiGroup: rbac.authorization.k8s.io kind: ClusterRole name: cluster-adminsubjects:- kind: ServiceAccount name: kubernetes-dashboard namespace: kube-system
- Apply the full admin privileges to the dashboard service account using the dashboard-admin YAML file.
kubectl create -f dashboard-admin.yaml
- It will take a few seconds to apply the settings.
Enabling the proxy
- From the master server, execute the below command to run the kubernetes proxy command in the background.
nohup kubectl proxy --address="192.168.3.81" -p 443 --accept-hosts='^*$' &
Note: We have specified the master kubernetes server IP address in the address option. It may vary based on your environment.
- Hurray! The proxy address has been added successfully.
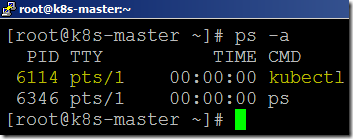
- Now, you can verify the process status using the below command.
- In case you want to delete the process use the following kill command.
kill -9 <process ID>
Example: kill -9 6114
Accessing the dashboard
- Open the web browser from your local PC and access the below URL.
http://192.168.3.81:443/api/v1/namespaces/kube-system/services/https:kubernetes-dashboard:/proxy/

- We can able to access the dashboard through the kubeconfig file or bearer token. We have already provided full admin access to the dashboard service account. So just click on SKIP option to access the dashboard.
- Now we will able to view the homepage of the kubernetes dashboard.
Video Tutorial
Thank you for taking the time to read our blog on “How To Install K8s Dashboard? – A Simple Guide“. We hope you found the information valuable and insightful. If you find any issues with the information provided in this blog don’t hesitate to contact us (info@assistanz.com).
Optimize your kubernetes and never lose a valuable customer again!
Our mission is to ensure that your containers remain lightning-fast and protected at all times by monitoring and maintaining it 24×7 by our experts.
Related Post
How to create the first POD in kubernetes?
How to set up a HAProxy load balancer in Ubuntu 20.04?


