Have you ever wondered how to extend the partition that contains your root directory or home directory with LVM? Your partitions may be insufficient and you need to increase their capacity. We will explore how to extend the storage using Logical Volume Manager in Linux.
What is LVM?
Logical Volume Management is a great way to expand the drive space by simply adding additional hard drives into it. It’s like a dynamic partition, where we can create, resize, and reduce the drive space using LVM.
STEP 1: Disk Extending / Disk Growing
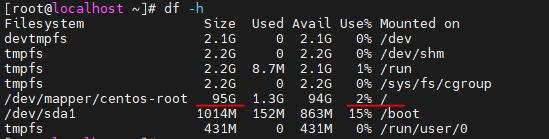
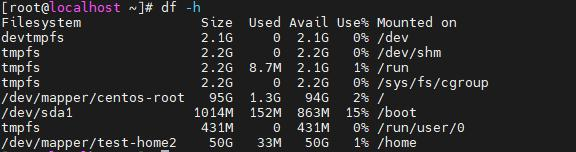
Before extending the /root partition using the LVM method, check the current disk space on the server by the command,
df -h ([root@localhost ~]# df -h)
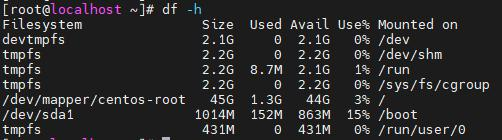
We can see that the / partition has a total disk space of 45GB and it’s not enough to proceed with our operations so we are going to add 50 GB more on this partition.
Now, we are going to attach a new physical disk on the server with a 100GB disk size and then split this 100GB disk into 2 separate disks which will have each 50GB disk.
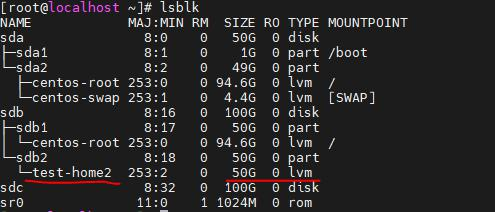
By running the following command we can check the attached disks on the server lsblk
([root@localhost ~]# lsblk)
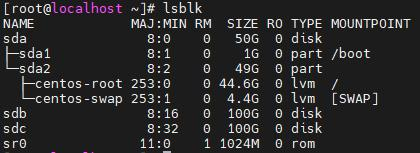
Here, we will take the attached disk of sdb for our usage.
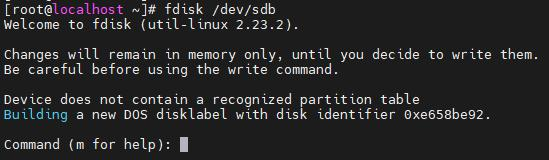
STEP 2: Splitting the disk into 2 separate disks
Now, we need to create 2 primary partitions and like sdb1 and sdb2, for adding a new PV, we have to use fdisk to create the LVM partition.
[root@localhost ~]# fdisk /dev/sdb
- To Create a new partition Press n.
- Choose the primary partition and use p.
- Choose which number of partitions to be selected to create the primary partition.
- Press 1 if any other disk is available.
- Change the type using t.
- Type 8e to change the partition type to Linux LVM.
- Press w to write the changes.
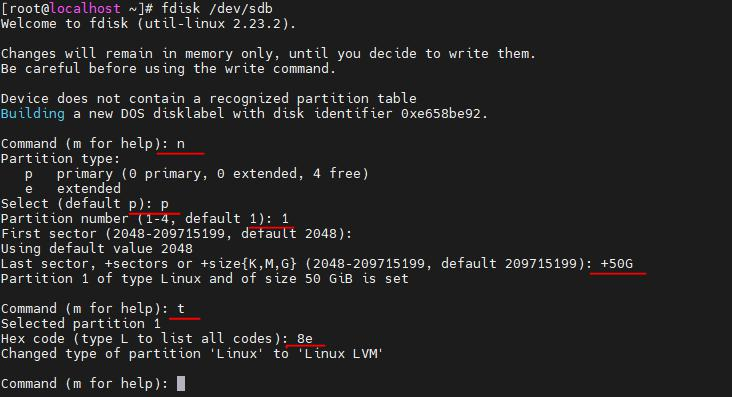
Great! The disk sdb1 is created and let’s create a sdb2 disk from sdb main disk.
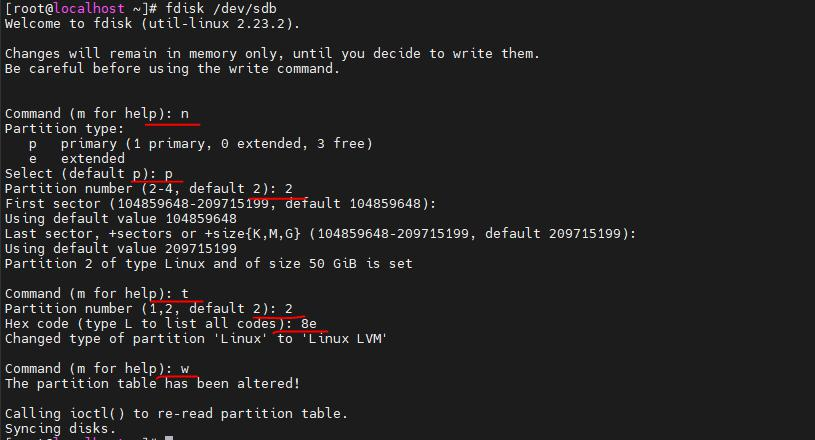
Hurray! We created both the sdb1 and sdb2 disks successfully. Next, we are going to create a new Physical Volume for the sdb1 disk,
[root@localhost ~]# pvcreate /dev/sdb1

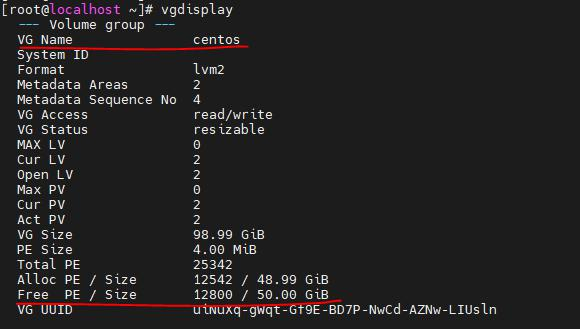
Now, check the available volume groups and find the exact volume group name for /root partition, [root@localhost ~]# vgs

Here, the /root partition’s volume group name is centos.
Add the created sdb1 Physical volume into the centos volume group,
[root@localhost ~]# vgextend centos /dev/sdb1

We can see which PV is used to create a particular Volume group.

Next, check the volume groups under each physical volume. We have added one PV under centos VG and it’s free to expand now.
To check the available Physical Extend disk size, run the below command,
[root@localhost ~]# vgdisplay
Now we can use the below command to expand the logical volume /root partition,
[root@localhost ~]# lvextend -l +12800 /dev/centos/root
Or, we can use this lvextend -l +100%FREE /dev/centos/root command to extend the volume group.

Next, we need to identify the file system type of the required partition by using the following command
[root@localhost ~]# df -hT
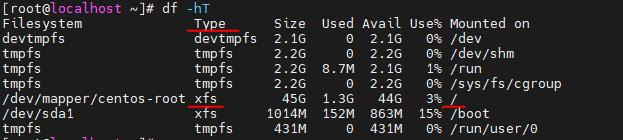
As we can see, the currently used file system type is xfs, let’s grow the /root partition with the extended logical volume,
[root@localhost ~]# xfs_growfs /dev/centos/root
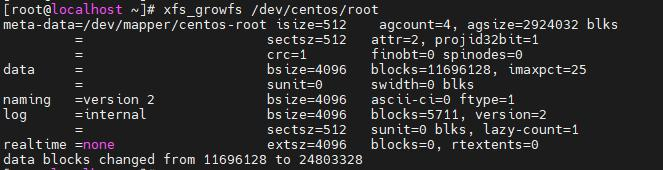
We need to verify the size of the extended partition.
STEP 3: Mounting /home2 in separate mount-point
Create a PV for the sdb2 disk and a new volume group for the sdb2 disk on the server.
[root@localhost ~]# pvcreate /dev/sdb2

[root@localhost ~]# vgcreate test /dev/sdb2
(here, the test is a volume group name, you can replace the volume group name test with any other name according to your wish.)

Now, check the available volume groups on the server,
[root@localhost ~]# vgs

We are going to check the available free physical extend size under the test volume group, [root@localhost ~]# vgdisplay test

Next, we need to create a logical volume for the sdb2 disk,
[root@localhost ~]# lvcreate -n home2 -l 100%FREE test
(Here, the home2 is a logical volume group name and it is not a mount point, and you can replace home2 with any other name.)
The -n option is used to indicate a name for the LV, whereas -L sets a fixed size, and -l (lowercase L) is used to indicate a percentage of the remaining space in the container VG.

Check the newly created logical volume under the test volume group,
[root@localhost ~]# lsblk
Make /home2 directory on the server, [root@localhost ~]# mkdir /home2

Mount the /home2 as a separate mount point,
[root@localhost ~]# mount /dev/test/home2 /home2

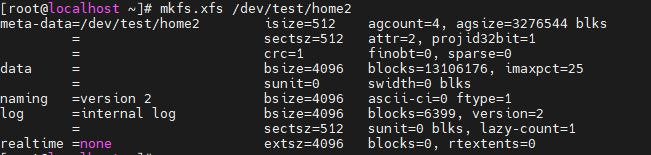
After mounting /home2 as a separate mount-point create a file system type for /home2. Here, we create xfs as the file system type for /home2.
[root@localhost ~]# mkfs.xfs /dev/test/home2
Identify the UUID for the /home2 partition, and permanently mount the /home2 partition on the server.
[root@localhost ~]# blkid /dev/test/home2

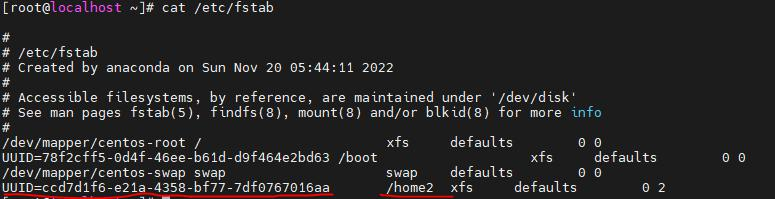
Now, Copy this UUID for the /home2 partition and add it to the fstab file,
[root@localhost ~]# vi /etc/fstab
(Note: take a backup of fstab file before making the changes in it)

Check the added UUID in fstab for /home2 partition,
[root@localhost ~]# cat /etc/fstab
Check the newly created and mounted /home2 partition on the server.
Finally, we extended our disk using LVM in the Linux server. Thank you for taking the time to read our blog on “How to expand LVM storage on a Linux server?”. We hope you found the information valuable and insightful. If you find any issues with the information provided in this blog don’t hesitate to contact us (info@assistanz.com).
Optimize server speed and never lose a valuable customer again!
Our mission is to ensure that your server remains lightning-fast and protected by monitoring and maintaining it 24×7 with our experts.
Related Posts
Learn how to recover the LVM partitions in Linux?
How To Mount Google Cloud Storage Bucket In Linux?
Pingback: antibiotics for sinusitis
Pingback: augmentin
Pingback: furosemide 20 mg
Pingback: viagra pill imprint
Pingback: reddit finasteride depression
Pingback: what does finpecia do
Pingback: tadalafil low dose
Pingback: ozempic coupon code
Pingback: doxycycline hyclate used for pneumonia
Pingback: toradol treatment duration
Pingback: ivermectin evidence summary
Pingback: ivermectin demodex mite reduction
Pingback: minoxidil 2% vs 5% foam vs liquid