Creating the templates is like blueprints for cloud infrastructure. They offer a standardized, efficient, and repeatable way to build, manage, and scale cloud environments, ultimately saving time, money, and resources while ensuring consistency and reliability. In the following blog, we will show you how to create Windows Template CloudStack for Windows 2012, 2012 R2 & Windows 2016.
Steps to Create Windows Template
Prerequisites
- Install a new VM (any version of Windows) in the Cloud stack.
- Install all the recommended updates through Windows updates snap-in.
- Then download Cloud Instance Manager and install it with default settings
This tool generates the administrator password automatically for the Cloud stack VMs.
Steps to generate the unattended files using Windows system image manager
Steps to install WAK
- To create an unattended answer file, download and install the Windows Assessment and Deployment Kit (WDK) from the Microsoft site to your local PC
- Make sure you have selected the below list of components during installation.
Steps to upload Windows image in ADK
- Click on the icon from the program menu
- Under the Windows Image section, right-click and select Windows Image.
- Locate the install.wim file in the \sources directory of the install media. Just click and open it. Another way is to extract the install.wim file from the Windows image or install media to your local drive.
- Select the appropriate Windows version from the pop-up screen.
- It will generate the catalog file using install.wim and it will take a few minutes to complete.
- Windows components will display once the image is mounted in WSIM.
Steps to create the answer file
- Click on File and select the new answer file.
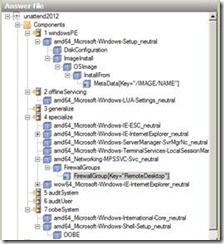
- Once you add all the components in the answer file, you will get the window as below.
- Now save the answer file as unattend.xml using the file menu.
Generalizing the OS
- Now copy the XML file to the corresponding server to convert as a template.
- Go to C:\Windows\System32\Sysprep folder and copy the unattend.xml into that folder.
- Go to the command prompt, and change the directory path to c:\windows\system32\sysprep, and execute the below command.
Sysprep /oobe /generalize /unattend:unattend.xml /shutdown
- Once you execute the command, sysprep will generalize the OS based on the answer file.
- After the completion, the server will shut down automatically.
Creating windows template from Cloudstack
- Now login into the Cloud stack and click on the server instances.
- Click on View Volumes.
- Now click on Quick View and select the Create Template option.
- From the pop-up screen, provide the Template Name, Description, and OS type, with public, password enabled, and featured options enabled. Then click OK.
- You can see the template creation process in the cloud stack notification area.
- Once it’s complete the template is ready for the VM deployment.
Thank you for taking the time to read our blog on “How to create the Windows template in Apache Cloudstack?”. We hope you found the information valuable and insightful. If you find any issues with the information provided in this blog don’t hesitate to contact us (info@assistanz.com).
Optimize your cloud and never lose a valuable customer again!
Our mission is to ensure that your cloud remain lightning-fast and protected at all times by monitoring and maintaining it 24×7 by our experts.


