What is Swap Space?
- When an operating system no longer can put data on RAM then it uses some area of hard disk space to store data that area is called “SWAP space”.
- The SWAP space/partition is space on a disk created for use by the operating system, when your physical RAM usage exists 75% then the swap memory will act as a virtual RAM memory on the server. It can either be a partition or a file on a disk.

Recommended Swap Space for CentOS7/RHEL7:
The amount of swap recommended for CentOS depends on a number of factors including the amount of memory in the system and the workload imposed on that memory
Example: 4GB of RAM requires a double (8GB) of swap space.
There are two methods by which we can increase the swap space:
- SWAP partition
- SWAP File
Check the System for Swap Information
1. To check the available swap space
- # swapon -s
- # cat /proc/swaps
Note: If nothing is returned by the command, then the summary was empty and no swap file exists.

2. To check the system overall space
- # free -h
Note: As you can see, our total swap space in the system is 0.

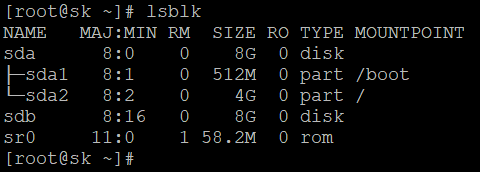
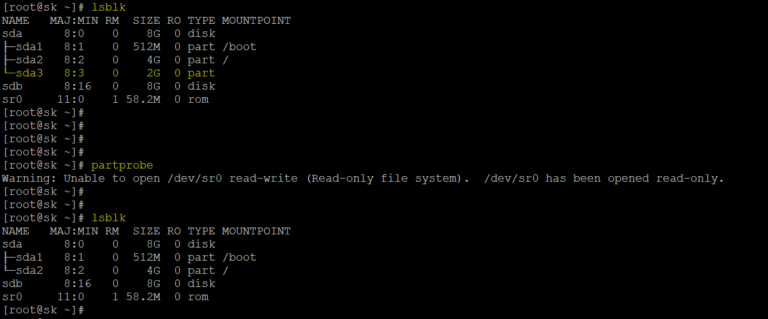
3. Check Available Storage Space
In this scenario, we can just as easily create a swap partition that resides on an existing hard disk. Before we do this, we should be aware of our current disk usage on the server. We can get this information by typing:
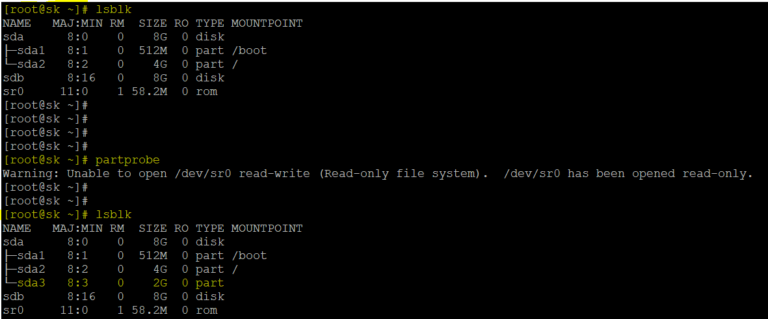
- # lsblk
How to create a SWAP partition by using “fdisk” on CentOS7/RHEL7
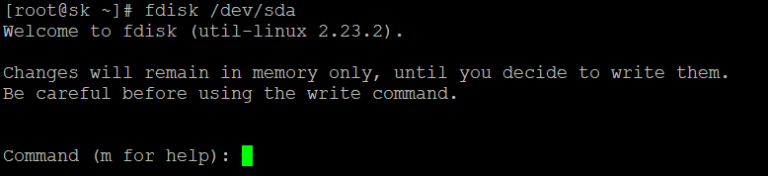
Step 1: Follow the below steps to create a new partition with swap ID
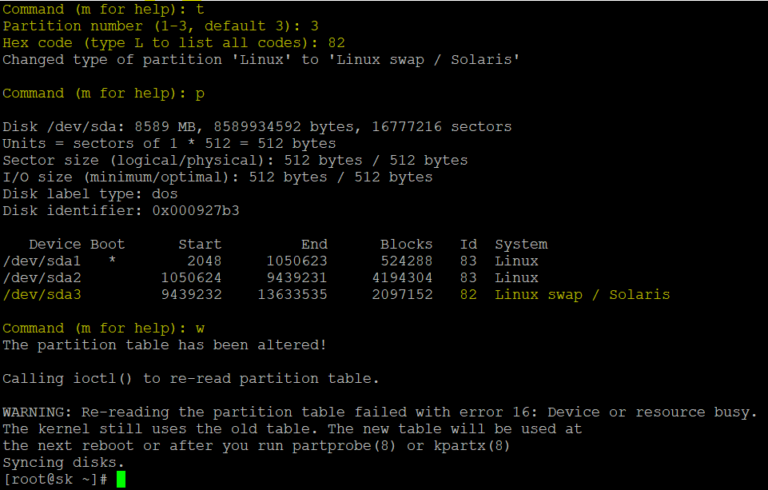
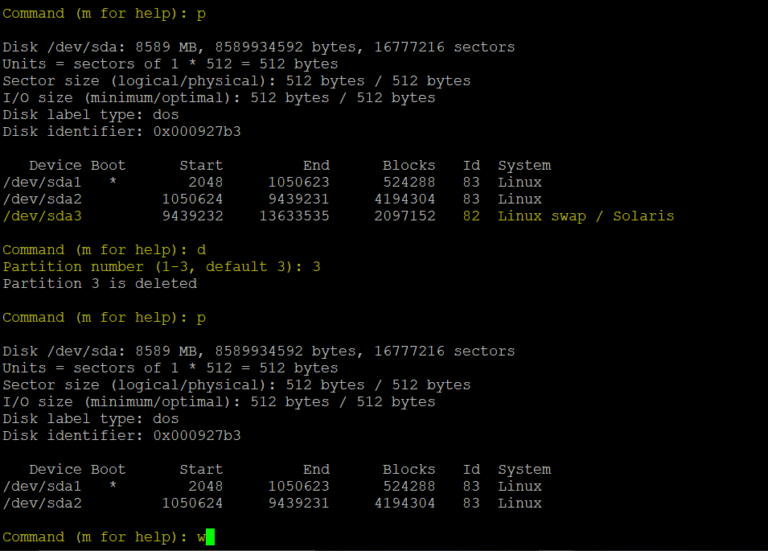
# fdisk /dev/sda
To display the current partitions type “p”. To create a new swap partition type “n”. Since this will be the first partition make it primary by selecting ‘p‘. Select ‘3’ for the partition number. To accept the default settings for the beginning sector, just press ‘enter’. On the next prompt entre a value of “+2G” to set the size of swap partition.
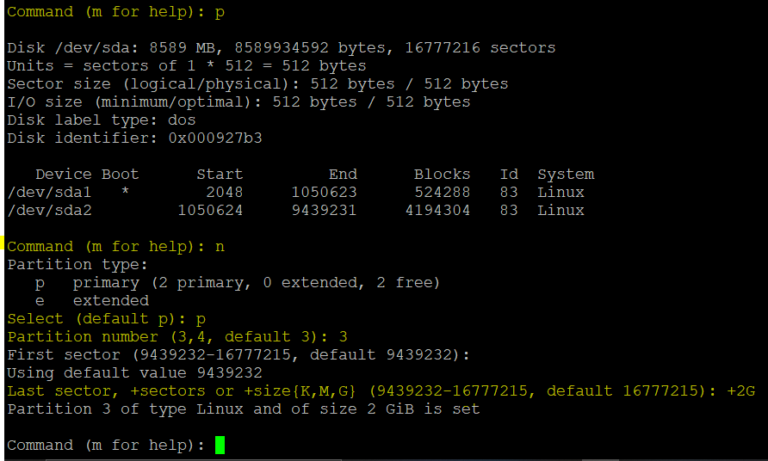
On the next prompt, press ‘t’ to change the partition type. Enter the number ‘3’, to change the partition that was just created. Type ‘82’ and press enter. Type 82 is for swap partitions. Verify the results by checking the partition table by typing ‘p’. Type ‘w’ to write the changes made.
NOTE: We will be concentrating more on the following commands (or flags).
m – Help
n – Create new partition
p – Print partition table
t – Change a partition’s system id
d – Delete partition
q – Quit without writing
w – Write to disk (Save & Exit)SURESH KUMAR
Step 2: Update to the kernel.
Reread the partition using the “partprobe” command for the kernel to see the newly created swap partition.
# partprobe
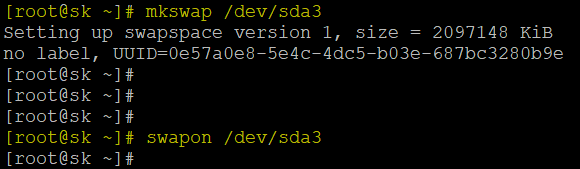
Step 3: Make a SWAP on that created partition.
- To create the swap association on the new device:
# mkswap /dev/sda3
- To activate swap partition:
# swapon /dev/sda3
Note:
- We cannot create files and directories directly in the partition.
- Before we use a partition for data storage we need to create a file system on it.
- This file system is used as virtual memory by the operating system.
- Swap space is the special space in a hard disk that is used as temporary memory.
- When requires, system moves back this data from swap to memory. This is the convenient way to improve kernel memory usage.
UUID (Universally unique Identifier)
– An UUID is a 128-bit number used to identify the information in the disk partitions.
– Each partition has a UUID. It generate when the file system generate in partition to the hard disk.
Step 4: Mount the partition to the mount point.
Mounting is used to link a directory to the partition or partition to a directory. (i.e.) create accessing point for access the disk partition.
There are 2 types of mounting:
- Temporary Mounting
- Permanent Mounting
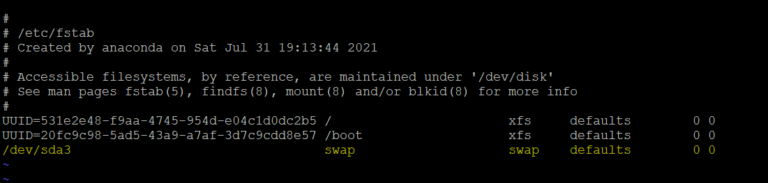
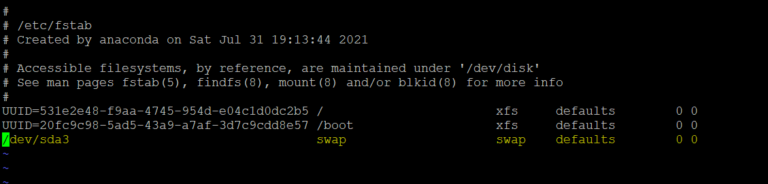
For the SWAP space partition, we can use permanent mounting for using the SWAP space when server boot time also. We can use the “/etc/fstab” file for permanent mounting. Add the entries for the permanent mounting as per the syntax.
Syntax: [What-to-mount] [Where-to-mount] [filesystem-type] default [priority-values]
# vi /etc/fstab
/dev/sdb3 swap swap defaults 0 0
:wq
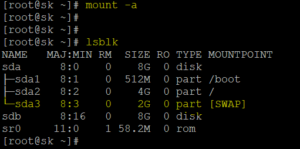
To activate the mount for the created partition on the server, please enter the following commands:
- # mount –a
- # lsblk
Step 5: Activate SWAP on the server.
- Activate the swap partition:
# swapon -a
- Verify it is present by executing:
# swapon –s


Remove Disk Swap partition in CentOS7/RHEL7 Linux
1. Disable swap using “swapoff” command
- Firstly you need to disable the swap partition
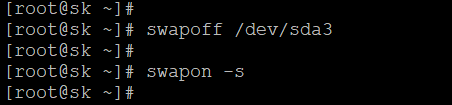
# swapoff /dev/sda3
- Check the status again by using “swapon –s” command to confirm if the swap is disabled.
# swapon –s
2. Unmount/Remove the swap Entry from /etc/fstab
Once it is disabled it can now be safely removed from /etc/fstab file by simply removing the entry or commenting out the Line.
# vi /etc/fstab
3. Delete the Partition by using “fstab”
# fdisk /dev/sda
To display the current partitions type “p”. To delete a swap partition type “d”. Select ‘3’ for the SWAP partition number.
4. To update the kernel.
# partprobe
How to create SWAP file on the CentOS7/RHEL7 server
Add File Swap Space in Linux:
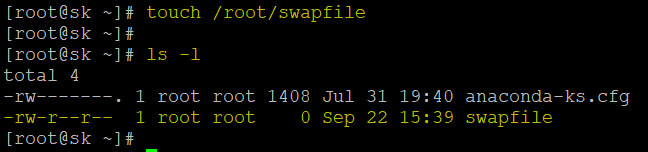
1. To create a zero byte file for swap space
- Create a zero byte file in the home directory of root user with help of following command:
# touch /root/swapfile
- List and check the created file under the /root directory with help of following command:
# ls –l /root/
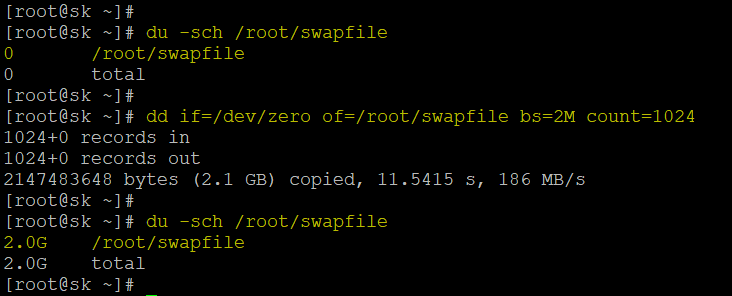
2. To allocate the size for the SWAP file.
- Allocate the size for the swap file with help of following command:
# dd if=/dev/zero of=/root/swapfile bs=2M count=1024
- Check the disk usage of the file
# du –sch /root/swapfile
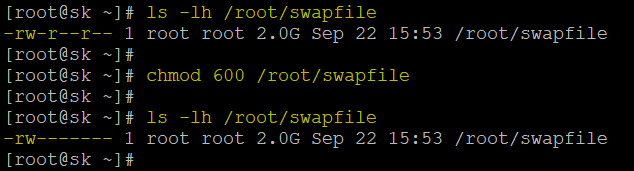
3. To verify the swapfile
# ls -lh /root/swapfile

4. To change the file permission for a swap file
The swap file should only access by the root user; you can execute the below command to configure the permission for “/root/swapfile”.
# chmod 600 /root/swapfile
5. To create swap space in the swap file
# mkswap /root/swapfile

6. To activate swap space
# swapon /root/swapfile

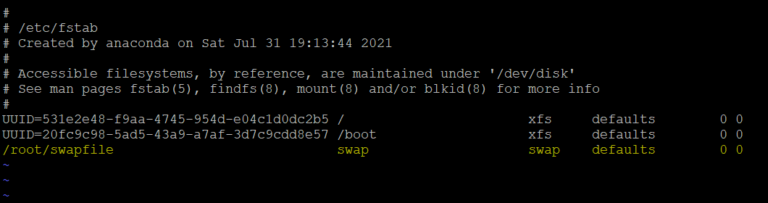
7.Permanent mounting the swap space by editing the /etc/fstab file.
# vi /etc/fstab
/root/swapfile swap swap defaults 0 0
:wq
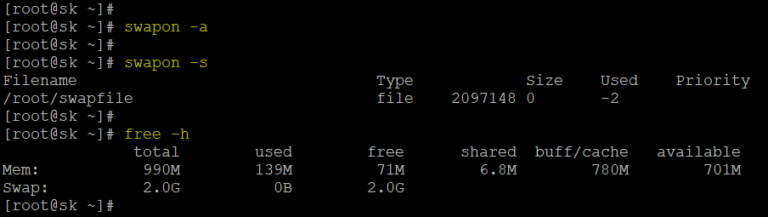
8. Activate the swap partition:
# swapon –a
9. Verify it is present by executing:
# swapon –s
10. To check how much is swap space available on system.
# free -h
Remove Disk Swap file in CentOS7/RHEL7 Linux
1. Remove entry from /etc/fstab
First you either need to remove or comment out the swap entry or from /etc/fstab file as shown below.
# vi /etc/fstab
2. Disable Swap with help of “swapoff” command
# swapoff /root/swapfile
Once disabled you can check the swap status again and confirm if the swap entry is indeed removed.
# swapon –s
3. Delete the File
# rm -f /root/swapfile

SURESH KUMAR