Building and Tagging Container Images in Windows 2016
In this blog, we will show how to Building and Tagging Container Images in windows 2016 using docker command using PowerShell.
BUILDING NEW CONTAINER IMAGE USING CACHE
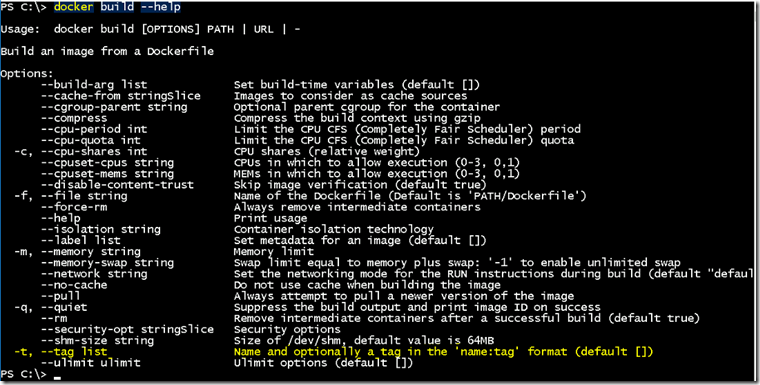
- You need to use docker build command to building and tagging the container images. If you run the help you will find the below option.
- Need to use the option –t to name and tag the container images.
- We have already built an image named web using dockerfile. Now we are building the second version of previous container image. Read this blog to learn how to create customize images: https://blog.assistanz.com/build-and-customize-container-image-in-windows-2016/
- First, Go to index.html and edit the file content as assistanz V2.
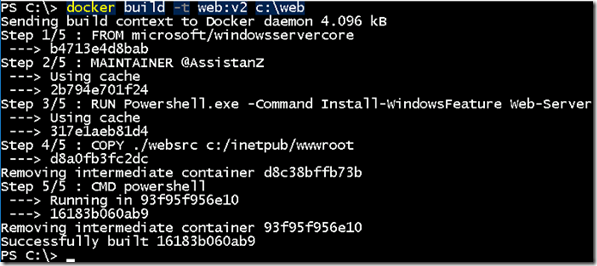
- Now build the image using the below command.
- Build ran extremely fast and completed successfully.
- You can notice the output it shows using cache underneath Step 2 & Step 3.
- This caching functionally is built-in with docker build process for building container images. It’s like re-using the settings that were done with the previous build to make things more efficient.
- In Step-4, it actually copied our modified file to wwwroot folder inside the container image.
- We can disable the cache using nocache option.
TAGGING THE CONTAINER IMAGE
- When we ran docker images command we can find two versions of container images named web.
- web V2 is the latest version, so we need to change the tag from V2 to latest.
- First, we change the web latest to web V1 using below command.
docker tag web:latest web:V1
- Now it will show two images with same image ID.
- To remove the tag from the old image execute the below command.
docker rmi web:latest
- Now docker images command will show only the two container images.
- Also, make sure that you always use the latest tag for most recent container images. We just need to repeat the process which we did earlier.
- We need to change the tag of web image from v2 to latest using below command.
docker tag web:v2 web:latest
- Now there will be two images under same image ID.
- Now remove the tag from the web v2 version using below command.
docker rmi web:v2
- Now we have only two images with V1 and latest tags.
- These tags will be used while creating the containers. For example.
VIDEO
Thanks for reading this blog. We hope it was useful for you to learn how to tag and untag the container images.

Loges


